As mentioned in the introduction, we have to start with the basics. So if you are more experienced, you might skip this chapter and stop by later. I deal here with what conclusions may be draw from just the physical features of a blade before introducing the characteristics and changes in sugata. This means, I will talk in this chapter – which will be divided into several blog posts – about blade constructions (tsukurikomi, 造込), blade lengths (nagasa, 長さ), curvature (sori, 反り), the width (mihaba, 身幅) and taper, tip (kissaki, 鋒), shinogi (鎬) and shinogi-ji (鎬地), niku (肉), thickness (kasane, 重ね), back (mune, 棟), grooves (hi, 樋), engravings (horimono, 彫物), and the tang (nakago, 茎).
Note and disclaimer: I will use some pics for this Kantei series that I have saved on my HD for a while now and where I am no longer sure where I got them from. So please, if you see a pic that is yours and I have not asked you for permission to use it, get in touch with me and I take it down immediately! And I apologize in advance for any inconvenience.
*
So the sugata serves first of all to date a blade. In a second step, characteristic features in a sugata can also point towards certain schools and smiths. So there is no getting away from it: If you want to appraise a Japanese sword, you have to know about the chronological changes in shape and what form and which sugata was made at what time. There is in my opinion no proper appraisal leaving aside the sugata. Even if later smiths made as faithful as possible copies of Kamakura or Nanbokuchô blades, there is usually always a hint or two in the shape which tells you that you are not facing an original. But one by one. First you pick up the sword and hold it with your arm outstretched in a vertical position. This gives you the best possible overview of the blade´s overall proportions and curvature. Also very important is the “feel” of the blade when lifting it up from the table. Does it feel massive or top-heavy? Or is it light and “easy to handle”? Experts and very experienced collectors are sometimes able to say kotô, shintô, or shinshintô just from lifting up the blade. Well, the weight and “feel” issue is not as easy as it seems and the rule of the thumb “light and easy to handle → kotô,” and “massive and top-heavy → shinshintô (or Satsuma)” is way oversimplified. There are differently interpreted Kamakura blades extant which feel heavy or are so well preserved as if made in shinshintô times. And certain shintô and shinshintô smiths made tachi which are as light as a Kamakura-era blade.
So how should one learn all these things and not give up right away when alone the sugata can be highly misleading? First of all, don´t let yourself be intimidated by the sheer mass of information and the fine subtleties. Study the chronological changes in sugata thoroughly and focus just on the typical characteristics of each era. The knowledge of all the exceptions and aforementioned subtleties comes by itself over time. Even after decades of nihontô studies you will come across blades which don´t fit anywhere and which tell you something new but this should not bother you at the beginning. As said, first learn the fundamentals of sugata as this is the only, or at least the easiest way to make progress. It is not recommendable to start in the middle or follow too early certain subtleties. That means if you know the all the fundamentals and come across something you can´t categorize, it is probably easier to place it after someone experienced informs you about why this certain blade is different. For example, if you come across a blade whose workmanship suggest late Kamakura but which looks more like early Kamakura or late Heian from the point of view of sugata, and someone explains you that there were certain smiths in late Kamakura times who revived (mostly towards the end of their career) these classic shapes, it might be easier to keep that in mind if you already know about the basic changes in Kamakura-period sugata. Or in other words, if you know the fundamentals, you might recognize that such a tachi looks classic. And this is not far off as this was actually what these smiths tried to make, that is to say classic tachi reminiscent of earlier periods. In this sense it cannot be repeated often enough that you should keep asking questions and that your studies should be supported by knowledgeable persons from time to time, in the ideal case at a kantei session held by one of the recognized sword associations or clubs. In the following I want to present a “checklist” whose order had proven to be the most effective approach in appraising a Japanese sword.
1.1 Tsukurikomi
As indicated, the tsukurikomi alone might occasionally allow you to draw some conclusions on schools and smiths. The tsukurikomi is usually also the feature that catches your eye first, even before you check out the sugata itself or things like the sori, taper, or kissaki. The different blade constructions are introduced one by one in the following:
shinogi-zukuri (鎬造): The most common tsukurikomi seen on Japanese swords, or rather on long swords. Also called hon-zukuri (本造). There are practically no conclusions you can draw from the fact that a blade is in shinogi-zukuri except well, it is not an ancient jôkotô, but chances are virtually zero that you come across a jôkotô in the wild. 
hira-zukuri (平造): A hira-zukuri blade has neither a shinogi nor a yokote. It is found on ancient chokutô-tachi but was in use since the Heian period as standard shape for tantô and ko-wakizashi, i.e. what was then the koshigatana. But with the Muromachi period, mostly during the eras Kôji (弘治, 1555-1558) and Eiroku (永禄, 1558-1570), also a considerable number of hira-zukuri katana was made. However, pre mid-Muromachi hira-zukuri long swords are extremely rare and those extant from the Kamakura and Nanbokuchô periods are mostly such made by renowned master smiths for a high-ranking clientel that became later treasure swords and were never used in any battle. 
kiriba-zukuri (切刃造), also kiriha-zukuri: Similar to a shinogi-zukuri but with the shinogi ridge very close to the cutting edge. We could also speak of an uncurved shinogi-zukuri blade with a very wide shinogi-ji. This tsukurikomi developed from the hira-zukuri interpretation and is, in the case of long swords, only seen on ancient blades or on some later hommages to ancient blades. For example, some bakumatsu and Meiji era smiths “experimented” with kiriba-zukuri shapes. The same applies to the katakiriba-zukuri. 
katakiriba-zukuri (片切刃造), also katakiriha-zukuri: Here one side is interpreted in hira-zukuri and the other in kiriba-zukuri. This tsukurikomi appeared towards the end of the Kamakura period but came again in fashion in the early and towards the end of the Edo period. At a variant of the katakiriba-zukuri, the one side is in kiriba-zukuri and the other side in shinogi-zukuri (instead of the hira-zukuri) (see bottom picture below). Representative schools and smiths are: Rai Kunitoshi (来国俊), the Hasebe (長谷部) school, Nobukuni (信国), Kagemitsu (景光), Sadamune (貞宗), Akihiro (秋広), Hirotsugu (広次), Takagi Sadamune (高木貞宗), the Echizen-Seki (越前関) school, the Horikawa (堀川) school, the Yasutsugu (康継) school, Onizuka Yoshikuni (鬼塚吉国), and Taikei Naotane (大慶直胤). 

kissaki-moroha-zukuri (鋒諸刃造): This tsukurikomi where the tip area is sharpened on both edges was introduced in the Nara period and as the famous Kogarasu-maru (小烏丸) has this shape, this tsukurikomi is also called Kogarasumaru-zukuri (小烏丸造り). This interpretation is usually limited to copies of the Kogarasu-maru and appears in larger numbers in the bakumatsu and early Meiji era., for example by Gassan (月山) smiths (see bottom picture below). Please note that also certain military swords are in Kogarasumaru-zukuri.

shôbu-zukuri (菖蒲造): Basically a shinogi-zukuri without yokote where the shinogi-ji drops off towards the mune. This rather sharp looking interpretation reminds of an iris (Japanese shôbu) leaf, thus shôbu-zukuri. A shôbu-zukuri is mostly seen on tantô and wakizashi of the Muromachi period and there are two different kinds of shôbu-zukuri: At one the shinogi meets in moroha-zukuri-manner the very tip of the sword (see top picture below) and at the other, the shinogi runs like the ko-shinogi up to the mune, just without a yokote (see bottom picture below). Representative schools and smiths are: For Yamashiro Rai Kunimitsu (来国光), Ryôkai (了戒), the Hasebe (長谷部) school, Nobukuni (信国); for Yamato Kaneuji (包氏), Shikkake Norinaga (尻懸則長), Aritoshi (有俊), and Kanetoshi (包利); the Shimada (島田) school; Sue-Sôshû smiths in general; for Mino the Shizu (志津) school and Kanenobu (兼信); the Fujishima (藤島) school; Nobunaga (信長); the Uda (宇多) school; the Hôjôji (法城寺) school; the Izumi Dôei/Michinaga (道永) school; the Sekishû (石州) school; for Bizen Nagamitsu (長光), Sanenaga (真長), Morikage (盛景), Chikakage (近景), Nagamori (長守), Motoshige (元重), the Un (雲類) group, the Yoshioka-Ichimonji (吉岡一文字) school, the Yoshii (吉井) school, Chôgi (長義), and Yoshikage (義景); the Aoe (青江); the Katayama-Ichimonji (片山一文字) school; the Mihara (三原) school; Akikuni (顕国), the Kaifu (海部) school; and for the south Sairen (西蓮), the Sa (左) school, the Ôishi-Sa (大石左) school, and the Naminohira (波平) school. 

kanmuri-otoshi-zukuri (冠落造): At this tsukurikomi, the blade starts at the base in shinogi-zukuri but then, usually rather early, the shinogi-ji gets a shôbu-zukuri-style slant which continues up to the tip. This interpretation was popular among Yamato smiths and appears in the early Kamakura period. It was later again revived by some shintô smiths. 

unokubi-zukuri (鵜首造): Similar to kanmuri-otoshi-zukuri but with only the middle shinogi-ji slanted, i.e. the base area is in normal shinogi-zukuri and the kissaki area widens again. An unokubi-zukuri is sometimes interpreted with a yokote and is usually seen on tantô and wakizashi. Representative schools and smiths are: Rai Kunitoshi (来国俊), Rai Kunitsugu (来国次), Rai Kunimitsu (来国光), Ryôkai (了戒), Yoshimitsu (吉光), the Taima (当麻) school, the Hoshô (保昌), school, Shikkake Norinaga (尻懸則長), the Tegai (手掻) school, Sadamune (貞宗), Shintôgo Kunimitsu (新藤五国光), Etchû Norishige (則重), Kokubunji Sukekuni (国分寺助国), Unji (雲次), Sukeyoshi (助吉), Nagamori (長守), Chôgi (長義), Yoshimitsu (義光), Tametô (為遠), Masamitsu (政光), Morikage (守景), Morikage (盛景), the Yoshioka-Ichimonji (吉岡一文字) school, the Ichijô (一乗) school, the Mino Jumyô (寿命) school, and the Mihara school (三原). The unokubi-zukuri was again revived in shinshintô times. 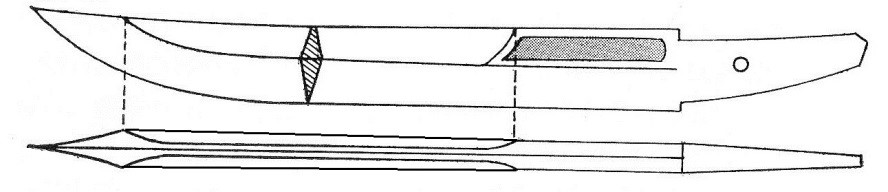

moroha-zukuri (諸刃造): A two-edged blade construction but which is slightly curved and where usually the sharpened shinogi-ji area is a bit thinner than the hira-ji area. This interpretation is first and foremost seen on tantô from the mid-Muromachi period, from around Bunmei (文明, 1469-1487) to Tenbun (天文, 1532-1555). Representative schools and smiths are: Kaga-Shirô (加賀四郎), the Sue-Sôshû (末相州) school, the Odawara-Sôshû (小田原相州) school, the Shimada (島田) school, the Sue-Seki (末関) school, the Hiroyoshi (広賀) school, Fuyuhiro (冬広), the Sue-Bizen (末備前) school, and the Kiyomaro (清麿) school. 

osoraku-zukuri (恐らく造): An uncommon shape with a very large kissaki. It goes back to the smith Shimada Sukemune (島田助宗) who engraved the characters osoraku onto the blade, thus the name osoraku-zukuri. It is basically only seen on tantô and ko-wakizashi and was actively revived by the shinshintô-era Kiyomaro (清麿) school. The osoraku-zukuri also became more fashionable in recent years and quite many shinsaku smiths get orders to make tantô in this shape.


*
1.2 Nagasa
Back to the “checklist.”The first thing to focus on is the nagasa. Has the blade a standard length or is it noticeably shorter or longer? If it is noticeably longer, it might either be an unshortened Kamakura or Nanbokuchô work or from shinshintô times. Or is it a daitô but in terms of length rather close to a larger wakizashi, the Muromachi period comes to mind. So in the next step, the nagasa has to be seen in context with the curvature, the mihaba, and all the other porportions as it is not really a precise indicator by itself.
*
1.3 Sori
Next on the checklist is the sori. Is it deep or shallow and where is its center? If you have a conspicious koshizori you are more likely in Kamakura times and if it is a clear sakizori, better focus on the later Muromachi period. That means the stronger the sakizori, the later the production time in the Muromachi period. And just a hint of sakizori might point to end of Nanbokuchô or early Muromachi. As for the koshizori, is this the “only” curvature you see or “feel” on a blade? If the koshizori “bends down,” i.e. runs out gently towards the tip you have probably an earlier Kamakura-era blade. If the sori increases again towards the tip, you are in the sphere of a toriizori. In other words, the more the sori increases towards the tip at the same rate as it appears towards the base, i.e. the more straightforward the toriizori is, the more likely it is that the blade is mid-Kamakura or later. So with enough experience you can narrow down the time between late Heian and late Kamakura just on the basis of how, or if the koshizori increases towards the tip.
The same goes for tantô. That means even if a tantô is rather short and looks straight at a glance, you have to go sure if it really has muzori or if there is uchizori, takenokozori, or a sakizori, although the latter is usually only found on daggers with a longer nagasa. So uchizori points towards Kamakura or towards a Kamakura-hommage of a later production time. And a takenokozori points to late Kamakura in general and for example to Norishige (則重) in particular. A sakizori on tantô does not appear before entering the Muromachi period and is only found as mentioned on blades which are actually sunnobi-tantô or hira-zukuri ko-wakizashi. And the stronger the sakizori, the later the production time in the Muromachi period.
As you see in the pictures below, the actual differences in sori are mostly quite subtle. Or in other words, it is rather rare that you come across a blade that has that a conspicious koshizori or sakizori. Another way to determine the sori rather than holding the blade in a vertical position, especially to see if there is sakizori, is to move the blade into a entirely horizontal position with the butt end of the hilt close to your face and at about the height of your eyes. When you follow now on the mune in this position, it should be easy to see how the blade curves.
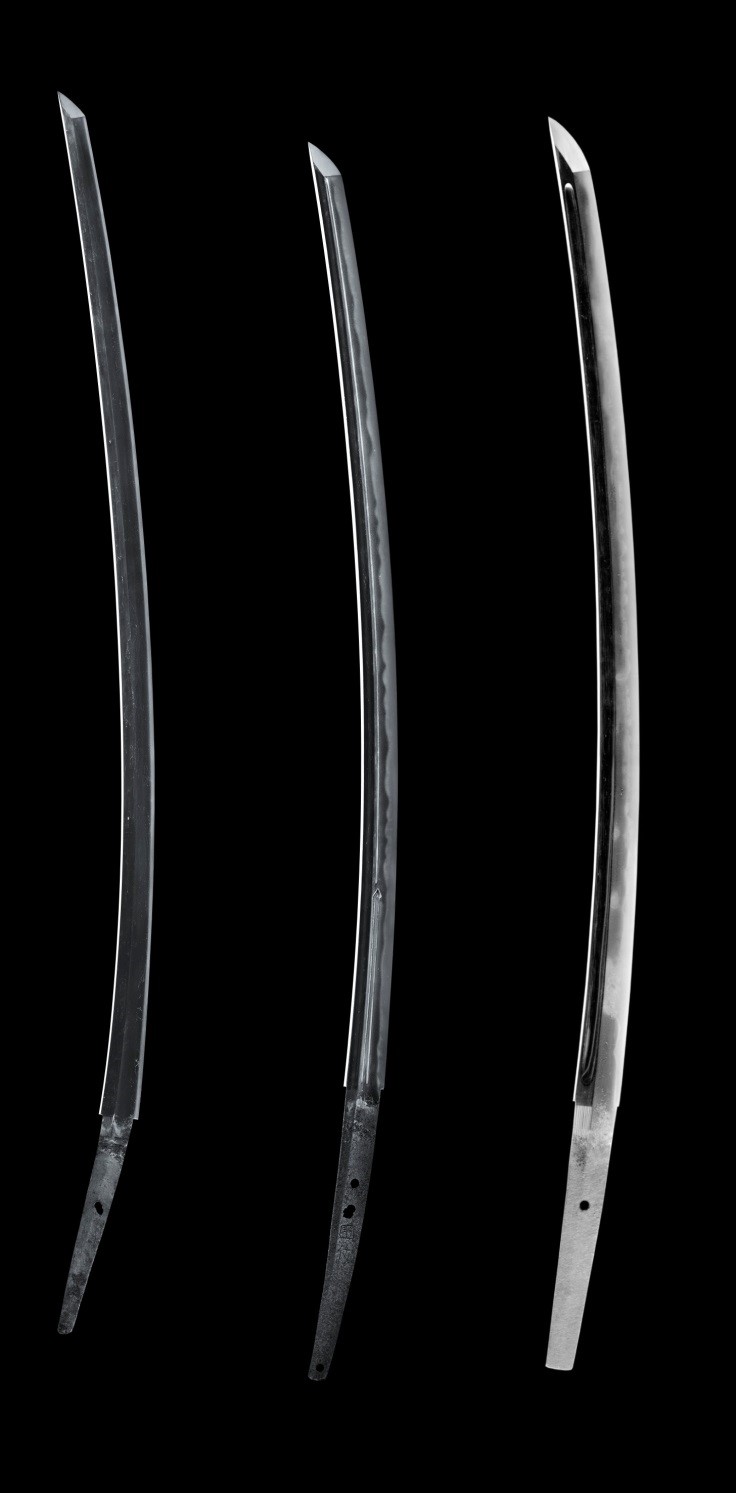
From left to right: koshizori, toriizori, sakizori
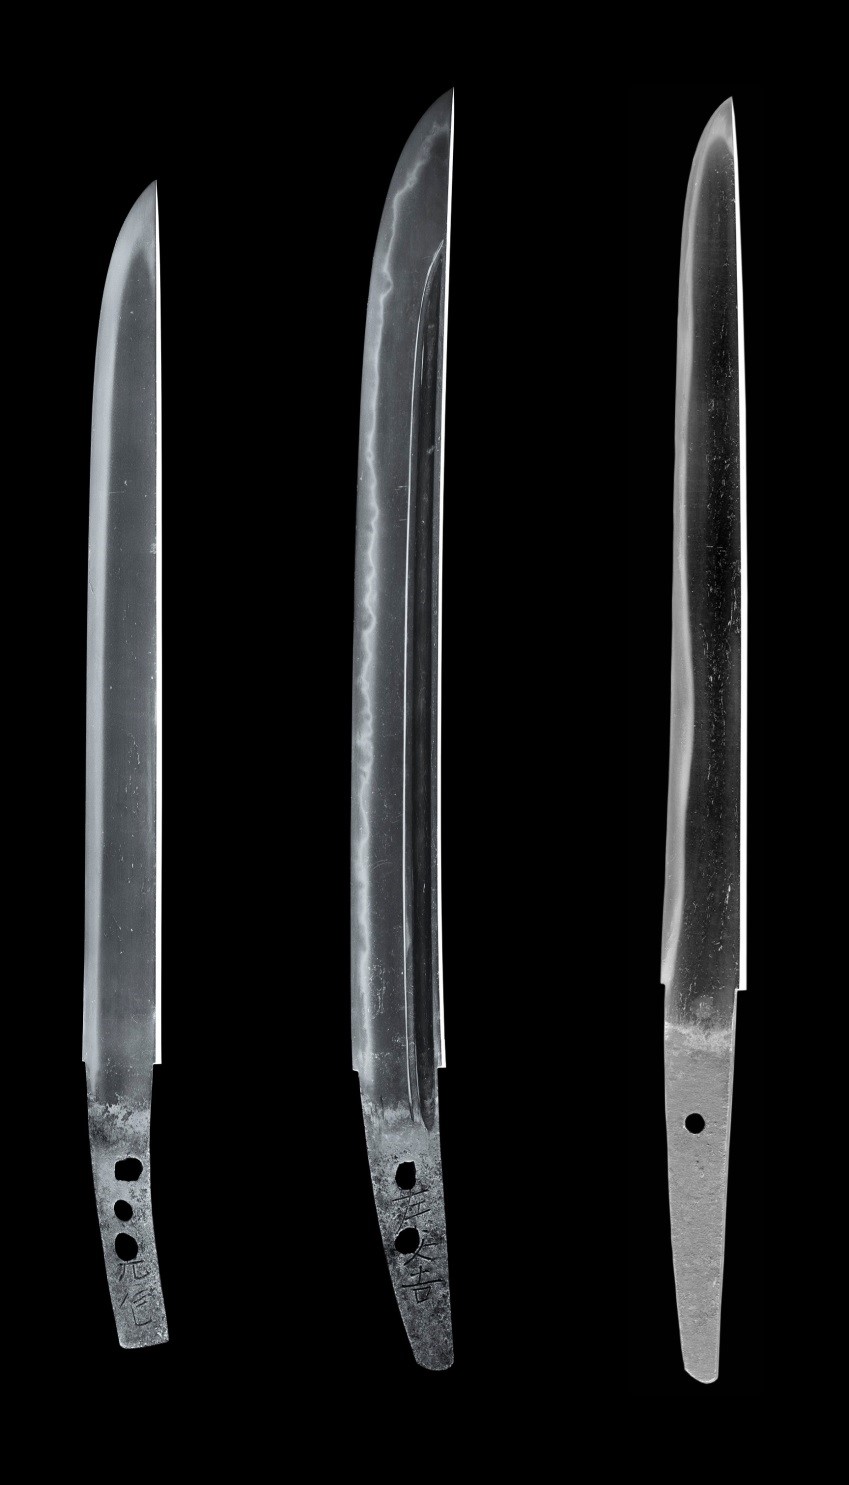
From left to right: uchizori, a little sori, takenokozori

Pingback: Japanese Sword Appraisal and Valuation • Sword Encyclopedia
Pingback: Examining Kissaki: The Blade Tip of a Japanese Sword - Swordis