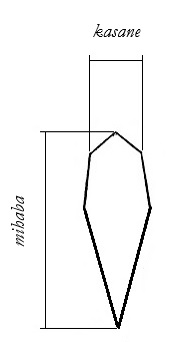
KANTEI 1 – SUGATA #3

1.7 Hi and horimono

First of all some terminology issues need to be clarified. The term horimono (彫物) is an umbrella term and refers to both grooves (hi, 樋) and engravings but the latter are also referred to as by the very same term horimono (彫物), or as by the term tôshin-bori (刀身彫). I am using the term horimono in the latter sense, that means I am always refer to engravings and never to grooves.

                                         horimono (彫物)

                       ⌈¯¯¯¯¯¯¯¯¯¯¯¯¯¯¯¯¯¯¯¯¯¯¯¯¯¯¯¯⌉

                 hi (樋)                            horimono (彫物) / tôshin-bori (刀身彫)

*

1.7.1 Hi (grooves)

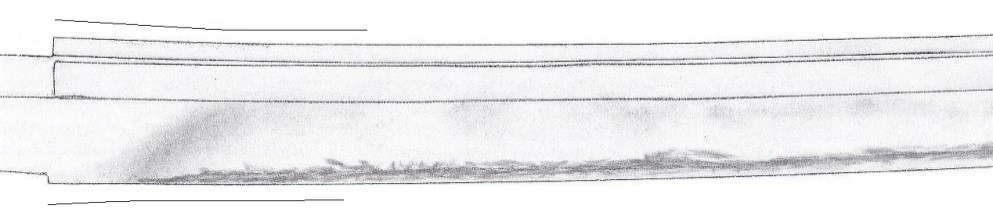
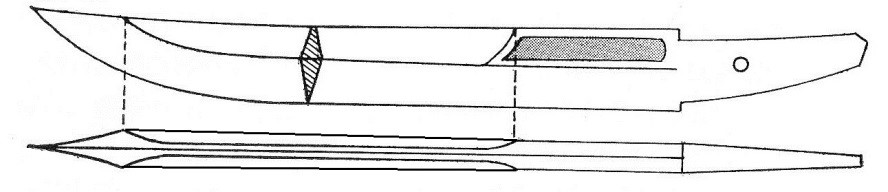
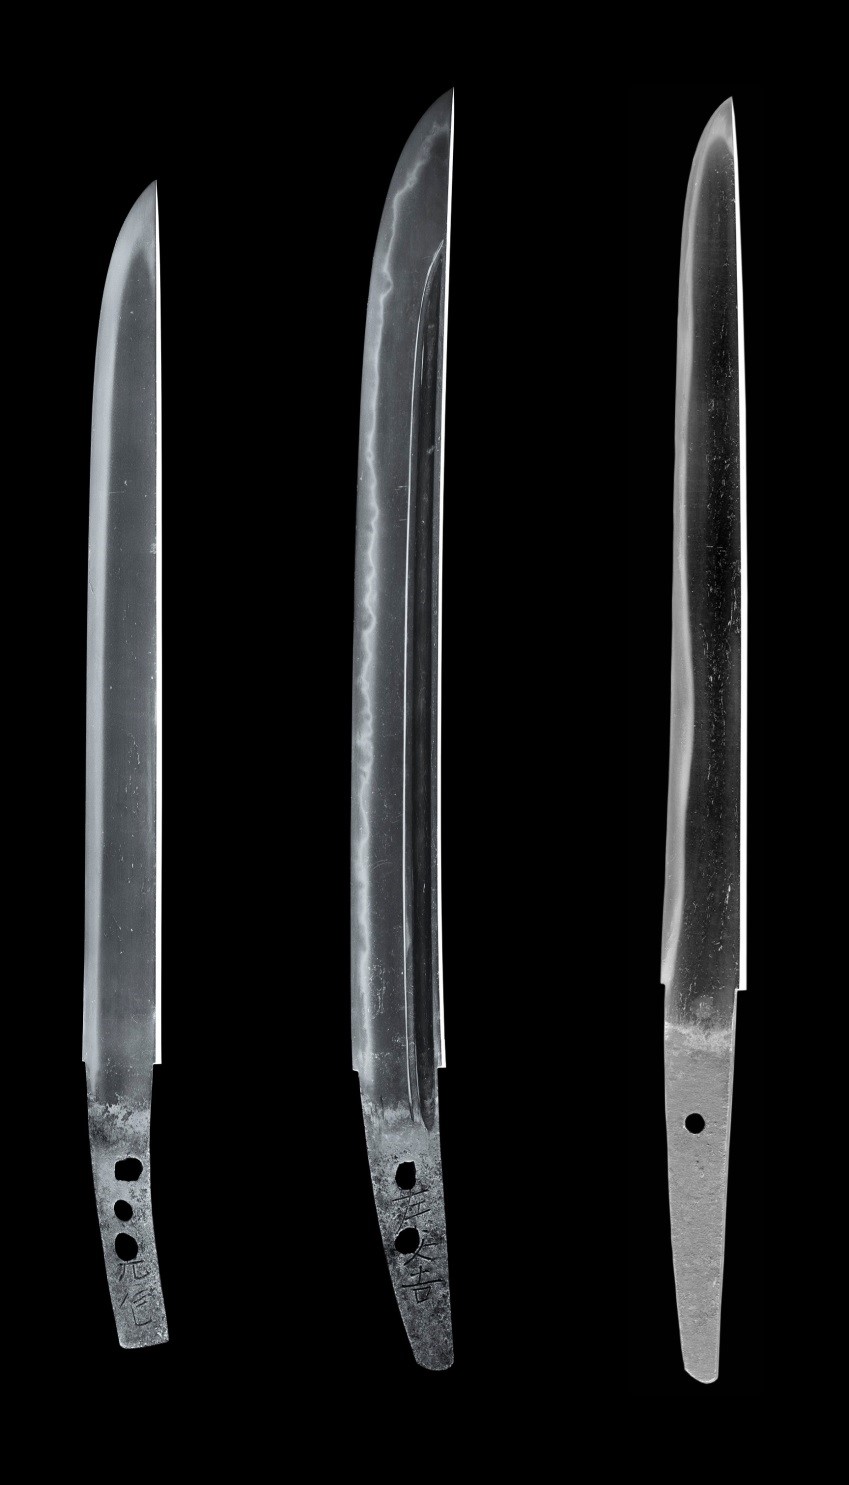
Well, also hi and horimono allow to a certain extent conclusions on the school or smith or the production time of a blade. The most common hi is that of a wide bôhi (棒樋) which was applied by so many schools and smiths and makes it impossible to quote any representative names. By the way, in the case of carved to a tantô or hira-zukuri ko-wakizashi, a wide bôhi is referred to as katana-hi (刀樋). One has to pay attention to how a bôhi was carved into a shinogi-zukuri blade. That means it can be carved directly along the shinogi or slightly set-off. This little leftover of the shinogi-ji is called chiri (チリ). Is the bôhi carved directly along the shinogi and leaves only a chiri towards the mune, we speak of kata-chiri (片チリ), and is the bôhi carved centrally on the shinogi-ji leaving a chiri along the shinogi and along the mune, we speak of ryô-chiri (両チリ). By the way, it is hardly ever seen that a bôhi extends from the shinogi to the very edge of the mune, i.e. leaving no chiri at all, or directly from the edge of the mune leaving just a chiri along the shinogi. A conspiciously wide bôhi is typical for Miike Tenta Mitsuyo (三池典太光世), Osafune Mitsutada (光忠), and Higo no Daijô Sadakuni (肥後大掾貞国), and a noticeably thin bôhi is typical for Sôshû smiths. But we can also see certain tendencies when it comes to the chiri. A kata-chiri is far more often seen on kotô blades with bôhi than on shintô blades. As this feature is so typical for kotô-bôhi, it is again hard to quote any representative names. When it comes to shintô, kata-chiri interpretations are typical for the Horikawa (堀川) school, the Hizen Tadayoshi (忠吉) school, Ogasawara Nagamune (小笠原長旨), Ippei Yasuyo (一平安代), and Yokoyama Sukesada (横山祐定), and are occasionally also seen on blades of Hankei (繁慶) and Kotetsu (虎徹). For shinshintô, we see kata-chiri preferrably at Suishinshi Masahide (水心子正秀), Taikei Naotane (大慶直胤), Oku Motohira (奥元平), Hôki no Kami Masayoshi (伯耆守正幸), and Gassan Sadakazu (月山貞一). For the kotô era, a ryô-chiri is more often seen at non-gokaden than gokaden smiths, for example at the Aoe (青江) school, the Enju (延寿) school (Kunitoki [国時], Kunimura [国村]), the Naminohira (波平) school, at Kashû Yukimitsu (加州行光), or at Kongôbyôe Moritaka (金剛兵衛盛高). Also we learn that a ryô-chiri is more often found on blades from the provinces of Kaga, Echizen, Etchû, Hôki, and Iwami, and on Sue-Niô (末二王) blades. When it comes to shintô, ryô-chiri interpretations are typical for Hankei, Ogasawara Nagamune, Sasaki Ippô (佐々木一峯), Higo no Daijô Sadakuni (肥後大掾貞国), Yamato no Daijô Masanori (大和大掾正則), and Echizen no Daijô Tadakuni (越前大掾忠国). But be careful: There is always the chance that a bôhi with ryô-chiri was later widened and became so a kata-chiri bôhi. Anyway, hi were often added later, a feature called ato-bi (後樋), so grooves are of course only indicators for kantei when they are original to the blade.

chiri

ryô-chiri left, kata-chiri right

Next thing to focus on is how a hi ends. Well, often a hi runs into the nakago – either due to shortening or intended by the smith – but if it ends before the habaki, it does that either in a roundish (maru-dome, 丸留), or in an angular manner (kaku-dome, 角留). Representative schools and smiths for a maru-dome are: Many Bizen smiths from the mid-Kamakura and Muromachi period, Nobukuni (信国), Heianjô Nagayoshi (平安城長吉), the Sue-Tegai (末手掻) school, the Kanabo (金房) school, the Horikawa (堀川) school, Ikkanshi Tadatsuna (一竿子忠綱), Tsutsui Kijû (筒井紀充), Echizen Yasutsugu (康継), Hankei (繁慶), Kotetsu (虎徹), Ogasawara Nagamune (小笠原長旨), the Hôjôji (法城寺) school, Suishinshi Masahide (水心子正秀), and Taikei Naotane (大慶直胤). Please note that a maru-dome might end noticeably higher at Kagemitsu (景光), Kanemitsu (兼光), Horikawa Kunihiro, and Kotetsu. And representative schools and smiths for a kaku-dome ending are: Tomonari (友成), Nagamitsu (長光), Kagemitsu (景光), the Ôei-Bizen (応永備前) school, Yoshii Kiyonori (清則), the Sue-Bizen (末備前) school (Kiyomitsu [清光]) Ôei-Nobukuni (信国), Ryûmon Nobuyoshi (龍門延吉), Shimada Yoshisuke (島田義助), the Ko-Mihara (古三原) school, Arikuni (顕国), the Taira-Takada (高田) school (Sadamori [定盛]), Inshû Kanenaga (因州兼長), Kanro Toshinaga (甘露俊長), Fujishima Tomoshige (藤島友重), Zenjô Kaneyoshi (善定兼吉), Dewa no Daijô Kunimichi (出羽大掾国路), Etchû no Kami Masatoshi (越中守正俊), Ogasawara Nagamune (小笠原長旨), the Hôjôji (法城寺) school, Yokoyama Sukesada (横山祐定), the Chikuzen Nobukuni (筑前信国) school, Hizen Tadahiro (忠広), Taikei Naotane (大慶直胤), Koyama Munetsugu (固山宗次), Kiyondo (清人), and Gassan Sadakazu (月山貞一).

dome

maru-dome left, kaku-dome right

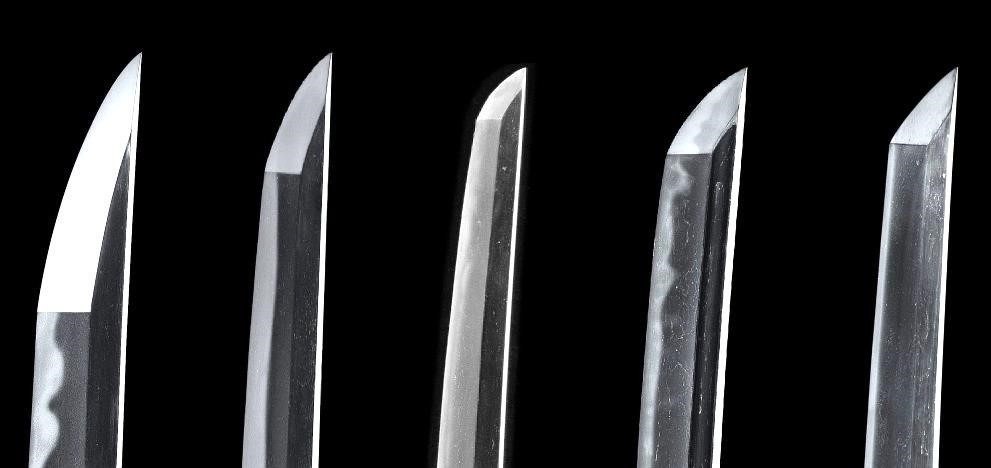
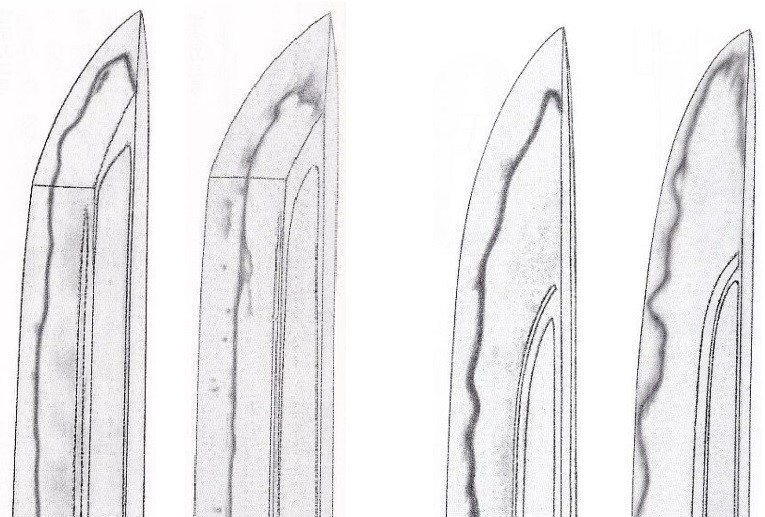
The next to check is how the hi ends towards the kissaki. There are basically two ways: Exceeding the yokote and more or less close to the ko-shinogi, a feature which is called hisaki-agaru (樋先上る), or before the yokote what is called hisaki-sagaru (樋先下る). Please note that a hisaki-agaru can be the result of a reshaped kissaki. That means the hi originally may have ended as hisaki-sagaru but due to a repair in the tip material had to be removed and the tip ends now at or towards the ko-shinogi. But when you look closely you can usually see if a hisaki-agaru ends in a straight and kind of awkward manner right at the ko-shinogi ridge (or even exceeds it a little), or if the hisaki-agaru tip leaves a chiri and runs parallel to the ko-shinogi. Hisaki-agaru is usually more often seen on kotô than on shintô blades and representative schools and smiths are: The Rai (来) school (Kuniyuki [国行], Kunitoshi [国俊], Kunimitsu [国光]), Nobukuni (信国), the Ko-Bizen (古備前) school, the Ichimonji (一文字) school, the Ko-Osafune (古長船) school (Mitsutada [光忠], Nagamitsu [長光], Kagemitsu [景光]), Kanemitsu (兼光), Kunimune (国宗), Hatakeda Moriie (畠田守家), the Ôei-Bizen (応永備前) school, Ryûmon Nobuyoshi (龍門延吉), the Enju school (延寿), Yukimitsu (行光), Horikawa Kunihiro (堀川国広), Etchû no Kami Masatoshi (越中守正俊), Echizen Yasutsugu (越前康継), Higo no Daijô Sadakuni (肥後大掾貞国), Hankei (繁慶), Teruhiro (輝広), Hizen Tadayoshi (忠吉), Suishinshi Masahide (水心子正秀), Taikei Naotane (大慶直胤), Koyama Munetsugu (固山宗次), and Kiyomaro (清麿). A noticeable hisaki-sagaru is typical for blades from the mid-Nanbokuchô period and representative schools and smiths are: The Tegai (手掻) school, the Shikkake (尻懸) school, Gô Yoshihiro (郷義弘), Tsunahiro (綱広), the Chôgi (長義) school, the Kanemitsu (兼光) school, the Motoshige (元重) school, the Aoe school (青江), the Sue-Aoe (末青江) school, the Sue-Sa (末左) school, the Sue-Seki (末関) school, Dewa no Daijô Kunimichi (出羽大掾国路), the Echizen Yasutsugu (康継) school, the Hôjôji (法城寺) school, Hizen Tadayoshi (忠吉), swords from Satsuma, and Sa Yukihide (左行秀).

hisaki

From left to right: hisaki-agaru (Ko-Bizen) hisaki-agaru (Kagemitsu), hisaki-sagaru (Chôgi) hisaku-sagaru (Aoe)

So far the basic features to check when examining a hi and now to the different kind of grooves which are introduced one by one. First the bôhi-related grooves. An interpretation which is called bôhi ni soebi (棒樋に添樋) is to carve a thin hi parallel along a bôhi and the thinner hi can either lie with the bôhi in the shinogi-ji or, directly at the shinogi, or slightly under the shinogi. A bôhi ni soebi is very rarely seen in Kamakura times and was more or less introduced by the Bizen smiths of the Nanbokuchô era. The interpretation had its heyday in the Muromachi period and is rare for the Mishina (三品) school, Ôsaka-shintô blades and blades from Satsuma province. Representative schools and smiths are: The Hasebe (長谷部) school, Nobukuni (信国), Sanjô Yoshinori (三条吉則), the Sue-Tegai (末手掻) school, the Sue-Shikkake (末尻懸) school, the Kanabo (金房) school, the Sue-Seki (末関) school, the Takada (高田) school, the Sue-Mihara (末三原) school, Horikawa Kunihiro (堀川国広), Dewa no Daijô Kunimichi (出羽大掾国路), the Hôjôji (法城寺) school, Miyoshi Nagamichi (三善長道), Aizu Masanaga (政長), Yamato no Daijô Masanori (大和大掾正則), Echizen Kanenori (越前兼則), Yamashiro no Kami Kunikiyo (山城守国清), the Chikuzen Nobukuni (筑前信国) school, the Hizen Tadayoshi (忠吉) school, or Taikei Naotane (大慶直胤).

A variant of the bôhi ni soebi is the bôhi ni tsurebi (棒樋に連樋), that is when the thinner soebi runs at the tip in front of the end of the bôhi up to the mune. The bôhi no tsurebi interpretation became more popular towards the end of the Muromachi period but is also seen on blades of famous Kamakura and Nanbokuchô-era master smiths. Representative schools and smiths are: The Rai (来) school (Kuniyuki [国行], Kunitoshi [国俊]), Nobukuni (信国), Sukezane (助真), the Ko-Osafune (古長船) school (Mitsutada [光忠], Nagamitsu [長光], Kagemitsu [景光], Sanenaga [真長]), Kanemitsu (兼光), Morimitsu (盛光), Yasumitsu (康光), Norimitsu (則光), Tsunahiro (綱広), the Horikawa (堀川) school, Ikkanshi Tadatsuna (一竿子忠綱), the Hôjôji (法城寺) school, the Chikuzen Nobukuni (筑前信国) school, and shinshintô smiths when working in the Bizen tradition like Suishinshi Masahide (水心子正秀), Taikei Naotane (大慶直胤), or Koyama Munetsugu (固山宗次). A bôhi ni tsurebi is sometimes also seen on blades of the Mishina (三品) school, of Nanki Shigekuni (南紀重国), Sendai Kunikane (国包), the Mizuta (水田) school, and on works from Satsuma smiths.

soetsure

Left two: bôhi ni soebi (Ôei-Bizen and Taira-Takada)

Right two: bôhi no tsurebi (Rai Kuntisugu and Naoe-Shizu Kanetomo)

Two parallel grooves of the same thickness are called futasuji-hi (二筋樋) and appear towards the end of the Kamakura period. Thus futasuji-hi on noticeably earlier swords are probably ato-bi. Also please note that futasuji-hi were later occasionally added to blades to “underline” a certain approach. In other words, an early Nanbokuchô-style blade that showed characteristics similar to Sadamune for example could have been “enlarged” with futasuji-hi as some famous blades of this master were known for this feature. Schools and smiths known for carving futasuji-ji are: Rai Kuninaga (来国長), Nobukuni (信国), Sadamune (貞宗), Tsunahiro (綱広), Kaneuji (兼氏), the Naoe Shizu (直江志津) school, Kinjû (金重), Izumi no Kami Kanesada (和泉守兼定), Wakasa no Kami Ujifusa (若狭守氏房), the Sengo (千子) school (Muramasa [村正], Masazane [正真]), Fujishima Tomoshige (藤島友重), Inshû Kanenaga (因州兼長), for Bizen Nagamitsu (長光), Chôgi (長義), Tomomitsu (倫光), Kanemitsu (兼光), Yoshimitsu (義光), and Morikage (盛景), the Chû (中) and the Sue-Aoe (末青江) schools, Dewa no Daijô Kunimichi (出羽大掾国路), Etchû no Kami Masatoshi (越中守正俊), the Yasutsugu (康継) school, the Hôjôji (法城寺) school, Miyoshi Nagamichi (三善長道), Aizu Kanesada (兼定), Kashû Kanewaka (兼若), the Echizen-Seki (越前関) school, the Echizen-Shimosaka (越前下坂) school, the Chikuzen Nobukuni (筑前信国) school, the Fujiwara-Takada (高田) school, the Hizen Tadayoshi (忠吉) school, Mondo no Shô Masakiyo (主水正正清), Taikei Naotane (大慶直胤), Minamoto Kiyomaro (源清麿), Oku Motohira (奥元平), and Oku Mototake (奥元武).

futasuji

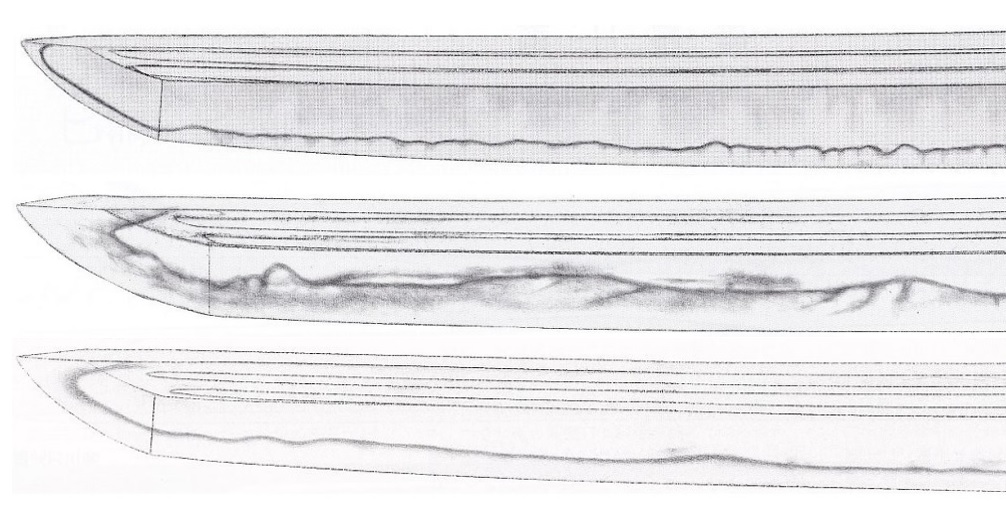
Examples of futasuji-hi, from top to bottom: Nagamitsu, Aoe, Fujishima Tomoshige

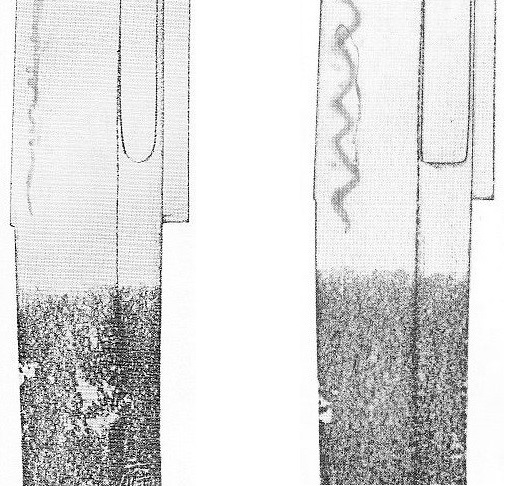
A variant of the futasuji-hi which is mostly found on hira-zukuri tantô or wakizashi is the take-kurabe (丈比べ, lit. “comparison of height”) where one thin hi ends noticeable before the other.

takekurabe

A take-kurabe on a sunnobi-tantô of Kanefusa (兼房, also named Kenbô).

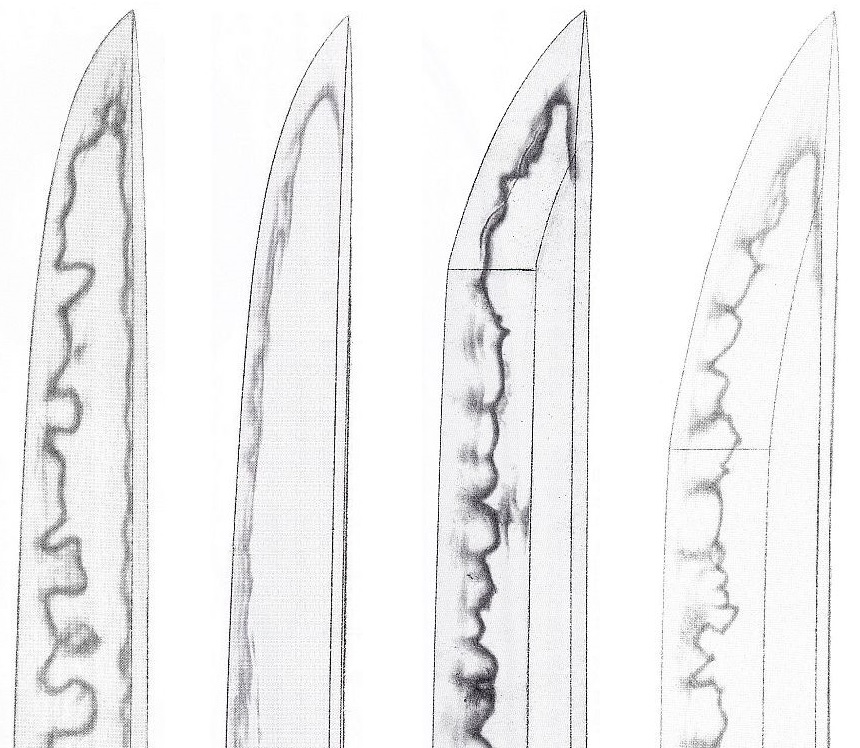
Another variant of the futasuji-hi is the shôbu-hi (菖蒲樋), that is when the tips of the two small grooves merge. Representative for adding shôbu-hi are the following schools and smiths: Rai Kunimitsu (来国光), Awataguchi Norikuni (則国), for Yamato the Taima (当麻), Hoshô (保昌), and Shikkake (尻懸) school, Sôshû Akihiro (秋広) and Hiromitsu (広光), Takagi Sadamune (高木貞宗), and the Miike (三池) school of Chikugo province. There is a variant of the shôbu-hi that comes in several interpretations and that is called kuichigai-bi (喰違樋). At one interpretation, the upper hi of a shôbu-hi, i.e. the one along the mune, is interrupted at a certain point (see picture below, top). At another interpretation, the bottom hi widens to a bôhi after the upper hi (see picture below, center). And at a third kuichigai-bi interpretation, the thin grooves are “crossing” somewhere on the blade (see picture below, bottom). In addition to those schools and smiths who applied shôbu-hi, a kuichigai-bi is also seen on blades by: Nobukuni (信国), Heianjô Nagayoshi (平安城長吉), Sanjô Yoshinori (三条吉則), the Hoshô (保昌) school, the Sue-Tegai (末手掻) school, the Kanabo (金房) school, the Sue-Mihara (末三原) school, the Uda (宇多) school, the Hiroyoshi (広賀) school, the Sue-Enjû (末延寿) school, Dewa no Daijô Kunimichi (出羽大掾国路), Etchû no Kami Masatoshi (越中守正俊), the Yasutsugu (康継) school, shintô blades from Echizen province, Taikei Naotane (大慶直胤), Kurihara Nobuhide (栗原信秀), and Gassan Sadakazu (月山貞一).

shobuhi

shôbu-hi

kuichigai

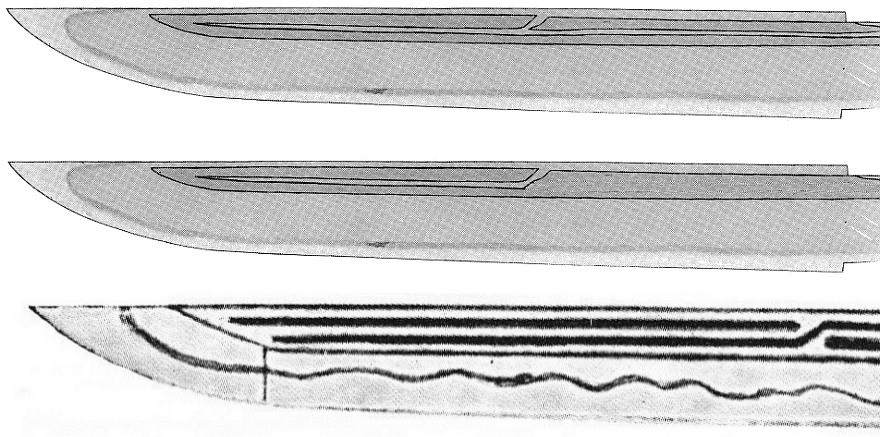
Three kuichigai-ba variants.

A koshi-bi (腰樋) is a short bôhi variant carved towards the base of a blade. It is usually carved on just the omote side with anoher hi variant on the ura and mostly seen on hira-zukuri tantô or ko-wakizashi, although also some kotô-era tachi show a koshi-bi. Representative schools and smiths for a koshi-bi are: The Awataguchi (粟田口) school, the Rai (来) school, Nobukuni (信国), Heianjô Nagayoshi (平安城長吉), Sanjô Yoshinori (三条吉則), Shintôgo Kunimitsu (新藤五国光) the Sue-Tegai (末手掻) school, Umetada Myôju (埋忠明寿), the Horikawa (堀川) school, Yasutsugu (康継), Ômi no Kami Tsuguhira (近江守継平), Sagami no Kami Masatsune (相模守政常), Higo no Daijô Sadakuni (肥後大掾貞国), Yamato no Daijô Masanori (大和大掾正則), Kanenori (兼則), Ujishige (氏重), Teruhiro (輝広), the Hizen Tadayoshi (忠吉) school, Suishinshi Masahide (水心子正秀), and Taikei Naotane (大慶直胤).

A popular combination to the koshi-bi are gomabashi (護摩箸), stylized ritual chopsticks which are basically a shorter futasuji-ji variant. Gomabashi are like koshi-bi rare for tachi and katana and mostly seen on hira-zukuri tantô or ko-wakizashi. Representative schools and smiths known for carving gomabashi are: The Awataguchi (粟田口) school (Kuniyoshi [国吉], Yoshimitsu [吉光]), the Rai (来) school (Rai Kunitoshi [来国俊], Kunimitsu [国光]), Nobukuni (信国), the Hasebe (長谷部) school, Heianjô Nagayoshi (平安城長吉), Sanjô Yoshinori (三条吉則), Shintôgo Kunimitsu (新藤五国光), the Masamune (正宗) school (Yukimitsu [行光], Sadamune [貞宗]), Kagemitsu (景光), the Ôei-Bizen (応永備前) school, the Sue-Bizen (末備前) school, Izumi no Kami Kanesada (和泉守兼定), Shimada Yoshisuke (島田義助), the Horikawa (堀川) school, Hizen Tadayoshi (忠吉), shintô swords from Echizen province, Suishinshi Masahide (水心子正秀), and Taikei Naotane (大慶直胤). Please note that Yamashiro smiths often combined the gomabashi with a suken on the other, i.e. the omote side. Apart from that it has to be mentioned that the Awataguchi smiths carved their katana-hi closer to the mune than the Rai smiths when it comes to grooves on Kamakura-period Yamashiro tantô.

hi-comp

Left: koshi-bi gomabashi combination on a Rai Kunitoshi;

right: katana-hi very close to the mune on a blade by Awataguchi Kuniyoshi

Another groove interpretation is the naginata-hi (薙刀樋), named after the fact that it is mostly found carved along the shinogi-ji of naginata before it sets off and thins out to the mune. But a naginata-hi is sometimes also found on blades in kanmuri-otoshi-zukuri and unokobi-zukuri. Representative schools and smiths for a naginata-hi are: Nobukuni (信国), Heianjô Nagayoshi (平安城長吉), Sanjô Yoshinori (三条吉則), the Sue-Tegai (末手掻) school, the Kanabo (金房) school, the Sue-Seki (末関) school, the Uda (宇多) school, Hôjôji Kunimitsu (法城寺国光), Ryôsai (良西), the Hiroyoshi (広賀) school, the Sue-Mihara (末三原) school, the Sue-Sa (末左) school, the Horikawa (堀川) school, Miyoshi Nagamichi (三善長道), Aizu Michitoki (道辰), Suishinshi Masahide (水心子正秀), Taikei Naotane (大慶直胤), Kurihara Nobuhide (栗原信秀), and Gassan Sadakazu (月山貞一).

naginatahi

Rather long naginata-hi on a kanmuri-otoshi-zukuri tantô of Ryôsai.

KANTEI 1 – SUGATA #2

1.4 Mihaba and taper

After you have checked out the more overall features of a blade, i.e. length and curvature, it is time to go into details regarding a blade’s shape. There is no rule what detail to focus on first or in which order you check a blade but to save time, for example at a nyûsatsu-kantei where others are waiting in line and where usually an accustic signal tells you when to put down the blade, I follow a bottom to top approach. Well, you usally don’t judge a mihaba (身幅) by itself but see it in context with the sakihaba (先幅), i.e. the width of the blade at the yokote. And so you automatically arrive at the taper. I will introduce all the typical sugata for each time in one of the next posts so in this section it is only important to point out that for example if a blade is long, strongly tapering, and deeply curved, it is likely a tachi of pre-Nanbokuchô times or a later tachi that follows a classical shape. Is it long, wide, shallowly curved, and does not taper much, chances are high to have a mid-Nanbokuchô, Keichô-shintô, or shinshintô blade. And a strong taper in combination with a very shallow sori and a compact chû-kissaki is very typical for a Kanbun-shintô. As mentioned, these are just examples and you have to study the characteristics in sugata that will be explained in one of the next posts.

Another feature which belongs to this category is funbari (踏張り). The term funbari is only applied to a blade that starts wide at the base and then tapers significantly over the first 4~5 cm (1.5~2 inches). That means just a wide blade which tapers noticeably but uniformly towards the tip does not have funbari. So if funbari is present you can assume that the blade is unshortened and has its original sugata. Sidenote: To recognize that a blade is in its original sugata is quite important as it puts into context features like nagasa, mihaba and tapering. In other words, if you have a blade in its original condition, you don’t have to speculate about the degree of shortening and how its original sugata might have looked like to start drawing conclusions on a possible production time. It is also important as you learn so if you are facing for example a tachi, a katana, or a tachi that has been shortened to a katana, i.e. to be worn as uchigatana. Back to funbari. Funbari is first and foremost typical for Kamakura-period tachi in general and for rather early Kamakura-period tachi in particular. Funbari is connected to the feature of yaki-otoshi, i.e. where the hardened edge starts at a considerable distance from the base. In the case of a yaki-otoshi, swordsmiths widened the blades towards the machi to specifically counteract any possible weakness in this area as it was not hardened.

funbari

Detail of a tachi by Ko-Hôki Yasutsuna with yaki-otoshi and funbari.

*

1.5 Kissaki

After the length, curvature, width, and tapering, you focus on the tip. Is it large, very large, medium-sized, or does it feel only slightly elongated, compact, or even stubby? All these are important indicators which either confirm your assumptions done so far on the basis of the previous characteristics or rule them out as they now no longer match. For example: You have a blade with a long nagasa, a deep koshizori, and a noticeable taper which you had dated so far somewhere before mid-Kamakura but which comes with an ô-kissaki, you can now rather rule out an early kotô and better switch to shinshintô. Of course this track has again to be either confirmed or dismissed by the characteristic features examined in the next steps. Or you have a magnificent blade that does not taper that much and which you had dated to Kamakura so far and which turns out to have an ikubi-kissaki. With this “discovery,” you can stay with the initial dating and focus on the next characteristics and see if you can further narrow down the kantei to a certain school or smith from that time. By the way, be careful with the term ô-kissaki. This means, an ô-kissaki actually might not be that big as you think when reading of this term. Or when you see a blade with just a larger but not “ridiculously” large tip, bear in mind that you might already face an ô-kissaki. What I try to say is: Don´t think automatically of a super-long nagamaki-style kissaki when the term ô-kissaki is dropped as transitions are fluid and an ô-kissaki might just be a hint longer than an elongated chû-kissaki. Again, the different kissaki interpretations are more easy to grasp in the next posts when we deal with the different sugata for each time. Here I am just introducing point by point the order or checklist of doing kantei. The rules of thumb when it comes to kissaki are: 1. The smaller the ko-kissaki, the earlier the blade probably is. 2. A chû-kissaki is the most common tip and found throughout all periods. 3. An ô-kissaki is most likely found on a blade from the Nanbokuchô, Keichô-shintô, and shinshintô era. 4. An ikubi-kissaki is as indicated usually only found on blades from the mid-Kamakura period, that is to say on mid-Kamakura blades that follow the more stout and wide approach (compared to the more slender tachi that were still produced at the same time). 5. And a kamasu-kissaki where the cutting-edge of the tip has virtually no fukura is usually restricted to very early kotô and jokotô or later reproductions of such ancient swords (but it might also be found on a blade where much material had to be removed at a restoration, e.g. due to a deep notch along the cutting-edge of the kissaki).

kissaki

From left to right: ô-kissaki, chû-kissaki, ko-kissaki, ikubi-kissaki, kamasu-kissaki.

With this we arrive at the fukura, the curvature or bulbousness of the tip’s cutting-edge. The fukura can be rounded or full, or not rounded or scarce, and this applies to longer swords in shinogi-zukuri with yokote as well as to short swords and tantô in hira-zukuri. Well, the bulbousness of the tip’s cutting-edge is kind of a tricky point as transitions are very fluid and subtle and quite many kissaki have been reshaped to a certain extent. So if you read of a full fukura, don’t think automatically of a super roundish kissaki and in case of a scarce fukura not of a very straight kamasu-style kissaki vice versa as the actual differences are as mentioned more subtle. A really noticeably scarce fukura can be seen for example on tantô of Samonji (左文字) or of the Sue-Sôshû school and on later Muromachi-period katana with an elongated chû-kissaki, e.g. of Magoroku Kanemoto (孫六兼元). Also the Kyô-utsushi tantô (i.e. Rai copies) of No-Sada and other Sue-Seki smiths have by trend a rather scarce fukura. A chû-kissaki with a scarce fukura is also very typical for Ôei-Bizen smiths. This means, if you have a classical tachi that looks like Bizen Kamakura at a glance, take a closer look at the kissaki and if you find out that its cutting edge is not that pronounced, keep this in mind and bring it in line it with features along the jigane and hamon as you might face an Ôei-Bizen work. Also known for making tips with a noticeable scarce fukura are the smiths of the Kiyomaro (清麿) school and occasionally also Sa Yukihide (左行秀) worked in that pointy tip style. And don’t forget, at Norishige, who is also known for making tantô with noticeably scarce fukura, the scarce fukura comes in combination with a peculiar uchizori what results in a takenokozori.

fukura

Scarce fukura on tantô and katana respectively and from left to right: Sue-Sôshû, Samonji, Kiyomaro, Kurihara Nobuhide

*

1.6 Shinogi and shinogi-ji

Also how the central ridge is applied must not be forgotten as the height of the shinogi and the width of the shinogi-ji can point towards a certain tradition or production time. We speak of a high shinogi when the cross-section of the blade is noticeably diamong-shaped or the distance between the two ridges is noticeably wide in cross-section compared to the width of the kasane respectively. Representative for a high shinogi are the Yamato and Yamato-related schools like the Uda (宇多) school, the Mihara (三原) school, the Iruka (入鹿) school, the Tadasada (忠貞) school, the Niô (二王) school, the Kongôbyôe (金剛兵衛) school, or the the Naminohira (波平) school. Also the Sue-Bizen (Sukesada [祐定], Kiyomitsu [清光], Harumitsu [春光]) and Sue-Seki (Kanesada [兼定]) schools are known for making blades with a noticeably thin kasane and a high shinogi. Also representative for this feature are smiths like Shintôgo Kunimitsu (新藤五国光), the Eitoku-era (永徳, 1381-1384) Mino Kanemitsu (兼光), Norishige (則重), Kozori Tsuneie (経家), Osafune Tadamitsu (忠光), Nanki Shigekuni (南紀重国), Sendai Kunikane (国包). Please note that a high shinogi comes mostly automatically with blade shapes like shôbu-zukuri and kanmuri-otoshi-zukuri and all kinds of naginata and nagamaki. So also schools like the Hôjôji (法城寺) school (Kunimitsu [国光]), the Katayama-Ichimonji (片山一文字) school (Norifusa [則房]), the Naoe-Shizu (直江志津) school, the Kanemitsu (兼光) and Chôgi (長義) schools, the Echizen-Yasutsugu (康継), Kiyomaro (清麿), and Taikei Naotane (大慶直胤) are on the list when it comes to a high shinogi as they often made naginata or nagamaki-naoshi-style blades.

A low shinogi is typical for Bizen and Sôshû blades, for example for the Ichimonji (一文字) school, the mid-Kamakura period Osafune (長船) school, or the Kozori (小反) school. Also representative for a low shinogi are: For Kyô-mono the Hasebe (長谷部) school, the early Nobukuni (信国) generations, the Daruma (達磨) school, the Heianjô (平安城) school; for Yamato Tegai Kanekiyo (包清); Rai Kuninaga (来国長); for Sôshû Sadamune (貞宗), Akihiro (秋広), Hiromitsu (広光), Yoshihiro (吉広), Masahiro (正広), Hiromasa (広正); for Mino Kanesada (兼定), Kanemoto (兼元), Kanetsugu (兼次), Kinjû (金重), Kaneyuki (金行); the Chiyozuru (千代鶴) school; Unji (雲次), Kanemitsu and Chôgi when not making nagamaki-style blades, Tsuda Sukehiro (津田助広), Ômi no Kami Sukenao (近江守助直), or the Hizen smiths. At Sukehiro and his students for example, the shinogi is usually extremely low so that it sometimes even seems optically as if the blade thins from the mune to the shinogi. The same applies to Sue-Bizen Sukesada. That means you have to be careful and check the height of the shinogi and its relation to the width of the kasane closely as there are Sue-kotô smiths like Sukesada or Kanesada who worked in the one or other style. And also the early Ko-Mihara smiths Masaie (正家) and Masahiro (正広) are known for applying a low shinogi in places even if the school has its roots in the Yamato tradition.

Now to the width of the shinogi-ji where also the rule of the thumb applies: Yamato and Yamato-related schools applied a wide shinogi-ji and Sôshû and Yamashiro smiths a narrow shinogi-ji . Also known for making blades with a wide shinogi-ji are: Mino Kanetsugu (兼次) and Kanesada (兼定), Osafune Mitsutada (光忠), Kozori Tsuneie (経家), the Un (雲類) group except for Unshô (雲生) from whom we know blades with a narrow shinogi-ji, Aoe Masatsune (正恒), and the Chikuzen Miike (三池) school. And representative for a narrow shinogi-ji are: The Awataguchi school (粟田口), Ko-Hôki Yasutsuna (安綱), Sekishû-mono (石州), for Bizen Ômiya Morikage (大宮盛景), Hidemitsu (秀光), Masatsune (正恒), and Sanetada (真忠), and for shintô times for example Kotetsu (虎徹).

shinogiji

From left to right: wide Yamato shinogi-ji (Shikkake Norinage), narrow Sôshû shinogi-ji (Sadamune)

*

1.6 Mune, kasane and niku

I put these three elements together as I usually look at them kind of together, quasi as first group of features that require a rotating of the blade. So after lifting the blade up to check its weight and “feel” and looking at it as a whole to determine the length, curvature, taper, and interpretation of the tip, it is time to look at it from the back and at different angles to see how the back ridge (mune, 棟) is interpreted, how thick it is, i.e. what kasane (重ね) it has, and to what extent the cutting edge bulges, i.e. niku what (肉) it has. First the mune. Here we distinguish roughly between a flat kaku-mune (角棟), a round maru-mune (丸棟), a two-surfaced iori-mune (庵棟), and a three-surface mitsu-mune (三ッ棟), and further how high the ridge is or how steep the lateral areas (oroshi, 卸・おろし) go down to the blade respectively in the case of an iori-mune, and how wide the top level is in case of a mitsu-mune. A kaku-mune is usually only seen on ancient blades but rarely also on some short and thick Sue-Bizen (末備前) tantô (e.g. yoroidôshi). A maru-mune is also typical for ancient swords but was occasionally also applied by the following smiths or schools: The Hasebe (長谷部) school, Nobukuni (信国), the Heianjô (平安城) school, Kaga Shirô Sukemasa (加賀四郎資正), the Môgusa (舞草) school, Fuyuhiro (冬広), the Ko-Bizen (古備前) school (Masatsune [正恒], Tomonari [友成], Kanehira [包平]), Osafune Nagamitsu (長光), Bizen Shirô Kuniyasu (備前四郎国安), Sukezane (助真), the Ko-Aoe (古青江) and Aoe (青江) school, the Mihara (三原) school, the Miike (三池) school, the Taira-Takada (平高田) school, and the Naminohira (波平) school. When it comes to an iori-mune, a high or steep interpretation is typical for Yamato-related schools and for Hankei (繁慶) for example. A gentle or low interpretation is rather typical for Bizen blades in general. A mitsu-mune in turn speaks for the Sôshû tradition and for tantô of the Yamashiro smiths. As for Sôshû-mono, the earlier masters applied more a mitsu-mune with a wide top surface whereas the Sue-Sôshû smiths applied rather a narrow top surface. A mitsu-mune is also typical for Umetada Myôju (埋忠明寿), the Horikawa (堀川) school, Echizen Yasutsugu (康継), i.e. at Keichô-shintô smiths who focused on the great Sôshû masters, but it can be found on all later copies of or hommages to early Sôshû works.

kasane

Measuring the kasane.

With checking the mune, you automatically arrive at the kasane. The term kasane is commonly used to refer to the thickness of a blade but please bear in mind that strictly speaking, it means the thickness at the mune, i.e. where the ridges of the back end and go over into the shinogi-ji (see picture above). So in the case of a high shinogi, the blade might be described as thick although the actual kasane is thin. The kasane can be an important key in appraising a sword. For example, mid-Nanbokuchô blades in Enbun-Jôji-sugata (more on this blade form later) are known for having a very thin kasane for their length and width. Later revival works from the Keichô-shintô and shinshintô times copy the overall sugata very well but come mostly with a somewhat thicker kasane. In other words, if you are facing a magnificent and wide blade with an ô-kissaki and you are not sure if Nanbokuchô or something later, check the kasane before turning towards the blade characteristics. It might give you an idea where the direction goes, i.e. stay with Nanbokuchô or focus on the possibility of a later copy. Also known for a considerably thin kasane is the Hasebe (長谷部) school. Even for mid-Nanbokuchô and the already existing trend to a thin kasane the Hasebe’s kasane is strikingly thin. So if you have lets say a sunnobi-tantô or hira-zukuri ko-wakizashi in Enbun-Jôji-sugata which shows a very thin kasane, it is advisable to check if the workmanship matches with the characteristic features of the Hasebe school. But also check the ratio of moto-kasane (元重ね) and saki-kasane (先重ね), i.e. the “tapering” of the thickness. Is the kasane decreasing uniformly from base to tip, or is there a certain drop of the thickness? In the latter case, chances are high that a blade had seen a more “intense” polishing at the monouchi area, i.e. the area with which a target is hit in the ideal case. This also shifts the balance significantly and a blade which has lost a lot of material towards the tip feels lighter or more “easy to handle” as it originally was what in turn might set you on the wrong track.

And finally the niku. Here a distinction is made between ha-niku (刃肉) and hira-niku (平肉) whereat the former describes the rate of the niku from the cutting edge to the habuchi, and the latter the rate of the niku from the habuchi to the shinogi. But this differentiation is rather sophisticated and mostly just the general term niku is used to describe the bulging of the cutting surfaces in cross-section. The fullness of the niku depends on the what kind of target the blade is designed for to cut, that means the harder the target the fuller the niku has to be. A noticeably full niku is typical for blades from the Kamakura period and a variant of a full niku which only drops towards the very cutting edge is called hamaguri-ba (蛤刃) (see picture below). With the mid-Nanbokuchô period, the niku decreases significantly. Niku can get low due to repeated polishing but a good polisher tries to preserve the original geometry of a blade as good as possible. That means removing the full niku of a Kamakura-era blade when not absolutely necessary would be considered as no go. So one has to be careful and take into consideration the age of a blade. A noticeably low niku is typical as mentioned for the mid-Nanbokuchô period but also for their later “revival counterparts” made in Keichô-shintô and shinshintô times. Incidentally, the distribution of the niku is called niku-oki (肉置) or niku-dori (肉取り).

hamaguriba

Hamaguri-ba.

And last but not least for this group of features it is also advisable to check if a blade has ubu-ha (生ぶ刃), an unsharpened cutting-edge at the very base. Ubu-ha is a sign that a blade is unshortened and hasn´t seen much polishes. So if you recongize ubu-ha on a classic tachi of which all characteristics point towards Kamakura, be careful and try to double-check other features to find out if you are facing one of the extremely a rare and healthy blades from that time or, what is more likely, a later copy. By the way, I have seen a Sa tachi with such a conspicious ubu-ha in Japan some years ago that I ended up at shinshintô utsushimono with my bid. So this blade quasi experienced only the absolute minimum of polishes over the last ~650 years!

Token-Bijutsu Articles

Before we continue with the Kantei series, I have compiled a list of almost all editorial and smaller articles (more than 400) that were published in the NBTHK Token-Bijutsu magazine over the last two decades (issues #427-711). A few issues are missing as I didn’t have all the editions available when I scanned all the articles for my archive. As stated in the PDF, there is a column with the netto pages per article so if you are interested in a translation of a certain article, just multiply this number with the price for a full page as stated in the top menu of this blog.

PDFLogo

TOBI-Logo

KANTEI 1 – SUGATA #1

As mentioned in the introduction, we have to start with the basics. So if you are more experienced, you might skip this chapter and stop by later. I deal here with what conclusions may be draw from just the physical features of a blade before introducing the characteristics and changes in sugata. This means, I will talk in this chapter – which will be divided into several blog posts – about blade constructions (tsukurikomi, 造込), blade lengths (nagasa, 長さ), curvature (sori, 反り), the width (mihaba, 身幅) and taper, tip (kissaki, 鋒), shinogi (鎬) and shinogi-ji (鎬地), niku (肉), thickness (kasane, 重ね), back (mune, 棟), grooves (hi, 樋), engravings (horimono, 彫物), and the tang (nakago, 茎).

Note and disclaimer: I will use some pics for this Kantei series that I have saved on my HD for a while now and where I am no longer sure where I got them from. So please, if you see a pic that is yours and I have not asked you for permission to use it, get in touch with me and I take it down immediately! And I apologize in advance for any inconvenience.

*

So the sugata serves first of all to date a blade. In a second step, characteristic features in a sugata can also point towards certain schools and smiths. So there is no getting away from it: If you want to appraise a Japanese sword, you have to know about the chronological changes in shape and what form and which sugata was made at what time. There is in my opinion no proper appraisal leaving aside the sugata. Even if later smiths made as faithful as possible copies of Kamakura or Nanbokuchô blades, there is usually always a hint or two in the shape which tells you that you are not facing an original. But one by one. First you pick up the sword and hold it with your arm outstretched in a vertical position. This gives you the best possible overview of the blade´s overall proportions and curvature. Also very important is the “feel” of the blade when lifting it up from the table. Does it feel massive or top-heavy? Or is it light and “easy to handle”? Experts and very experienced collectors are sometimes able to say kotô, shintô, or shinshintô just from lifting up the blade. Well, the weight and “feel” issue is not as easy as it seems and the rule of the thumb “light and easy to handle → kotô,” and “massive and top-heavy → shinshintô (or Satsuma)” is way oversimplified. There are differently interpreted Kamakura blades extant which feel heavy or are so well preserved as if made in shinshintô times. And certain shintô and shinshintô smiths made tachi which are as light as a Kamakura-era blade.

So how should one learn all these things and not give up right away when alone the sugata can be highly misleading? First of all, don´t let yourself be intimidated by the sheer mass of information and the fine subtleties. Study the chronological changes in sugata thoroughly and focus just on the typical characteristics of each era. The knowledge of all the exceptions and aforementioned subtleties comes by itself over time. Even after decades of nihontô studies you will come across blades which don´t fit anywhere and which tell you something new but this should not bother you at the beginning. As said, first learn the fundamentals of sugata as this is the only, or at least the easiest way to make progress. It is not recommendable to start in the middle or follow too early certain subtleties. That means if you know the all the fundamentals and come across something you can´t categorize, it is probably easier to place it after someone experienced informs you about why this certain blade is different. For example, if you come across a blade whose workmanship suggest late Kamakura but which looks more like early Kamakura or late Heian from the point of view of sugata, and someone explains you that there were certain smiths in late Kamakura times who revived (mostly towards the end of their career) these classic shapes, it might be easier to keep that in mind if you already know about the basic changes in Kamakura-period sugata. Or in other words, if you know the fundamentals, you might recognize that such a tachi looks classic. And this is not far off as this was actually what these smiths tried to make, that is to say classic tachi reminiscent of earlier periods. In this sense it cannot be repeated often enough that you should keep asking questions and that your studies should be supported by knowledgeable persons from time to time, in the ideal case at a kantei session held by one of the recognized sword associations or clubs. In the following I want to present a “checklist” whose order had proven to be the most effective approach in appraising a Japanese sword.


1.1 Tsukurikomi

As indicated, the tsukurikomi alone might occasionally allow you to draw some conclusions on schools and smiths. The tsukurikomi is usually also the feature that catches your eye first, even before you check out the sugata itself or things like the sori, taper, or kissaki. The different blade constructions are introduced one by one in the following:

shinogi-zukuri (鎬造): The most common tsukurikomi seen on Japanese swords, or rather on long swords. Also called hon-zukuri (本造). There are practically no conclusions you can draw from the fact that a blade is in shinogi-zukuri except well, it is not an ancient jôkotô, but chances are virtually zero that you come across a jôkotô in the wild. shinogi

hira-zukuri (平造): A hira-zukuri blade has neither a shinogi nor a yokote. It is found on ancient chokutô-tachi but was in use since the Heian period as standard shape for tantô and ko-wakizashi, i.e. what was then the koshigatana. But with the Muromachi period, mostly during the eras Kôji (弘治, 1555-1558) and Eiroku (永禄, 1558-1570), also a considerable number of hira-zukuri katana was made. However, pre mid-Muromachi hira-zukuri long swords are extremely rare and those extant from the Kamakura and Nanbokuchô periods are mostly such made by renowned master smiths for a high-ranking clientel that became later treasure swords and were never used in any battle. hira

kiriba-zukuri (切刃造), also kiriha-zukuri: Similar to a shinogi-zukuri but with the shinogi ridge very close to the cutting edge. We could also speak of an uncurved shinogi-zukuri blade with a very wide shinogi-ji. This tsukurikomi developed from the hira-zukuri interpretation and is, in the case of long swords, only seen on ancient blades or on some later hommages to ancient blades. For example, some bakumatsu and Meiji era smiths “experimented” with kiriba-zukuri shapes. The same applies to the katakiriba-zukuri. kiriba

katakiriba-zukuri (片切刃造), also katakiriha-zukuri: Here one side is interpreted in hira-zukuri and the other in kiriba-zukuri. This tsukurikomi appeared towards the end of the Kamakura period but came again in fashion in the early and towards the end of the Edo period. At a variant of the katakiriba-zukuri, the one side is in kiriba-zukuri and the other side in shinogi-zukuri (instead of the hira-zukuri) (see bottom picture below). Representative schools and smiths are: Rai Kunitoshi (来国俊), the Hasebe (長谷部) school, Nobukuni (信国), Kagemitsu (景光), Sadamune (貞宗), Akihiro (秋広), Hirotsugu (広次), Takagi Sadamune (高木貞宗), the Echizen-Seki (越前関) school, the Horikawa (堀川) school, the Yasutsugu (康継) school, Onizuka Yoshikuni (鬼塚吉国), and Taikei Naotane (大慶直胤). katakiriba

katakiriba1

kissaki-moroha-zukuri (鋒諸刃造): This tsukurikomi where the tip area is sharpened on both edges was introduced in the Nara period and as the famous Kogarasu-maru (小烏丸) has this shape, this tsukurikomi is also called Kogarasumaru-zukuri (小烏丸造り). This interpretation is usually limited to copies of the Kogarasu-maru and appears in larger numbers in the bakumatsu and early Meiji era., for example by Gassan (月山) smiths (see bottom picture below). Please note that also certain military swords are in Kogarasumaru-zukuri.kissakimorohakissakimoroha2

shôbu-zukuri (菖蒲造): Basically a shinogi-zukuri without yokote where the shinogi-ji drops off towards the mune. This rather sharp looking interpretation reminds of an iris (Japanese shôbu) leaf, thus shôbu-zukuri. A shôbu-zukuri is mostly seen on tantô and wakizashi of the Muromachi period and there are two different kinds of shôbu-zukuri: At one the shinogi meets in moroha-zukuri-manner the very tip of the sword (see top picture below) and at the other, the shinogi runs like the ko-shinogi up to the mune, just without a yokote (see bottom picture below). Representative schools and smiths are: For Yamashiro Rai Kunimitsu (来国光), Ryôkai (了戒), the Hasebe (長谷部) school, Nobukuni (信国); for Yamato Kaneuji (包氏), Shikkake Norinaga (尻懸則長), Aritoshi (有俊), and Kanetoshi (包利); the Shimada (島田) school; Sue-Sôshû smiths in general; for Mino the Shizu (志津) school and Kanenobu (兼信); the Fujishima (藤島) school; Nobunaga (信長); the Uda (宇多) school; the Hôjôji (法城寺) school; the Izumi Dôei/Michinaga (道永) school; the Sekishû (石州) school; for Bizen Nagamitsu (長光), Sanenaga (真長), Morikage (盛景), Chikakage (近景), Nagamori (長守), Motoshige (元重), the Un (雲類) group, the Yoshioka-Ichimonji (吉岡一文字) school, the Yoshii (吉井) school, Chôgi (長義), and Yoshikage (義景); the Aoe (青江); the Katayama-Ichimonji (片山一文字) school; the Mihara (三原) school; Akikuni (顕国), the Kaifu (海部) school; and for the south Sairen (西蓮), the Sa (左) school, the Ôishi-Sa (大石左) school, and the Naminohira (波平) school. shobu1

shobu2

kanmuri-otoshi-zukuri (冠落造): At this tsukurikomi, the blade starts at the base in shinogi-zukuri but then, usually rather early, the shinogi-ji gets a shôbu-zukuri-style slant which continues up to the tip. This interpretation was popular among Yamato smiths and appears in the early Kamakura period. It was later again revived by some shintô smiths. kanmuri

kanmuri1

unokubi-zukuri (鵜首造): Similar to kanmuri-otoshi-zukuri but with only the middle shinogi-ji slanted, i.e. the base area is in normal shinogi-zukuri and the kissaki area widens again. An unokubi-zukuri is sometimes interpreted with a yokote and is usually seen on tantô and wakizashi. Representative schools and smiths are: Rai Kunitoshi (来国俊), Rai Kunitsugu (来国次), Rai Kunimitsu (来国光), Ryôkai (了戒), Yoshimitsu (吉光), the Taima (当麻) school, the Hoshô (保昌), school, Shikkake Norinaga (尻懸則長), the Tegai (手掻) school, Sadamune (貞宗), Shintôgo Kunimitsu (新藤五国光), Etchû Norishige (則重), Kokubunji Sukekuni (国分寺助国), Unji (雲次), Sukeyoshi (助吉), Nagamori (長守), Chôgi (長義), Yoshimitsu (義光), Tametô (為遠), Masamitsu (政光), Morikage (守景), Morikage (盛景), the Yoshioka-Ichimonji (吉岡一文字) school, the Ichijô (一乗) school, the Mino Jumyô (寿命) school, and the Mihara school (三原). The unokubi-zukuri was again revived in shinshintô times. unokubi

unokubi1

moroha-zukuri (諸刃造): A two-edged blade construction but which is slightly curved and where usually the sharpened shinogi-ji area is a bit thinner than the hira-ji area. This interpretation is first and foremost seen on tantô from the mid-Muromachi period, from around Bunmei (文明, 1469-1487) to Tenbun (天文, 1532-1555). Representative schools and smiths are: Kaga-Shirô (加賀四郎), the Sue-Sôshû (末相州) school, the Odawara-Sôshû (小田原相州) school, the Shimada (島田) school, the Sue-Seki (末関) school, the Hiroyoshi (広賀) school, Fuyuhiro (冬広), the Sue-Bizen (末備前) school, and the Kiyomaro (清麿) school. moroha

moroha1

osoraku-zukuri (恐らく造): An uncommon shape with a very large kissaki. It goes back to the smith Shimada Sukemune (島田助宗) who engraved the characters osoraku onto the blade, thus the name osoraku-zukuri. It is basically only seen on tantô and ko-wakizashi and was actively revived by the shinshintô-era Kiyomaro (清麿) school. The osoraku-zukuri also became more fashionable in recent years and quite many shinsaku smiths get orders to make tantô in this shape.

osoraku

osoraku1

*

1.2 Nagasa

Back to the “checklist.”The first thing to focus on is the nagasa. Has the blade a standard length or is it noticeably shorter or longer? If it is noticeably longer, it might either be an unshortened Kamakura or Nanbokuchô work or from shinshintô times. Or is it a daitô but in terms of length rather close to a larger wakizashi, the Muromachi period comes to mind. So in the next step, the nagasa has to be seen in context with the curvature, the mihaba, and all the other porportions as it is not really a precise indicator by itself.

*

1.3 Sori

Next on the checklist is the sori. Is it deep or shallow and where is its center? If you have a conspicious koshizori you are more likely in Kamakura times and if it is a clear sakizori, better focus on the later Muromachi period. That means the stronger the sakizori, the later the production time in the Muromachi period. And just a hint of sakizori might point to end of Nanbokuchô or early Muromachi. As for the koshizori, is this the “only” curvature you see or “feel” on a blade? If the koshizori “bends down,” i.e. runs out gently towards the tip you have probably an earlier Kamakura-era blade. If the sori increases again towards the tip, you are in the sphere of a toriizori. In other words, the more the sori increases towards the tip at the same rate as it appears towards the base, i.e. the more straightforward the toriizori is, the more likely it is that the blade is mid-Kamakura or later. So with enough experience you can narrow down the time between late Heian and late Kamakura just on the basis of how, or if the koshizori increases towards the tip.

The same goes for tantô. That means even if a tantô is rather short and looks straight at a glance, you have to go sure if it really has muzori or if there is uchizori, takenokozori, or a sakizori, although the latter is usually only found on daggers with a longer nagasa. So uchizori points towards Kamakura or towards a Kamakura-hommage of a later production time. And a takenokozori points to late Kamakura in general and for example to Norishige (則重) in particular. A sakizori on tantô does not appear before entering the Muromachi period and is only found as mentioned on blades which are actually sunnobi-tantô or hira-zukuri ko-wakizashi. And the stronger the sakizori, the later the production time in the Muromachi period.

As you see in the pictures below, the actual differences in sori are mostly quite subtle. Or in other words, it is rather rare that you come across a blade that has that a conspicious koshizori or sakizori. Another way to determine the sori rather than holding the blade in a vertical position, especially to see if there is sakizori, is to move the blade into a entirely horizontal position with the butt end of the hilt close to your face and at about the height of your eyes. When you follow now on the mune in this position, it should be easy to see how the blade curves.

sori1

From left to right: koshizori, toriizori, sakizori

sori2

From left to right: uchizori, a little sori, takenokozori

KANTEI – Introduction

With this blog post I would like to start a series on kantei that is both addressed to beginners and to more advanced students and collectors of the Japanese sword. Accordingly – and depending on your knowledge – there might or more likely will be information that you already know but as the series is largely structured chronologically, you can stop by later and focus on the parts that you might find interesting or useful. With structured chronologically, I mean I will stick to the traditional approach in appraising Japanese swords because this approach turned out most effective on the one hand, and because all major publications are structured this way on the other hand, as it doesn’t make much sense to reinvent the wheel and to make things more complicated than they are. And the traditional approach is: 1. Shape (sugata, 姿) → 2. Steel (jigane, 地鉄) → 3. Hardening (hamon, 刃文), exactly in this order as these steps stand basically for: 1. Shape = Identifying the production time → 2. Steel = Identifying the area of production and/or the school → 3. Hardening = Identifying the school and/or smith (the latter of course by also incorporating the bôshi). All scholastic and other explanations, guidelines, tips, and some anecdotes here and there will be embedded into this basic three-step system. I will try to keep the chapter structure as traceable as possible but at a series like this I guess it is just inevitable to end up with chapters like 3.1.2.2 and the like. At the same time, larger chapters will stretch over several blog posts as everybody will understand that e.g. the Bizen tradition can’t be dealt with in a single post. As indicated, there will be a lot of basics along all these chapters but I try as best I can to make each chapter an interesting read. However, I hope that you will not take it amiss if certain sections might be found more or less the same way in well-known publications. Anyway, the series is on kantei and so I will omit for the most part biographical data of smiths and the like. Or in other words, I would like to focus on differences and characteristics in workmanship and I am not going too much into historic detail with all the school as this information is easily found elsewhere, unless it is necessary for the understanding of what I am trying to communicate. And as this series is on kantei in general and not just on nyûsatsu-kantei, I will also deal with tangs.

 kanteichu_a

Before we get started, I would like to write a few lines on kantei, that is to say from a very subjective point of view. I think the greatest challenge in getting a good feel for attributing blades to a certain school or smith is that you need a master plan. This means, it is not just the lack of available study material that holds one back as a lot has been written and published in the meanwhile. An issue of course is the accessibility of higher-quality or at least decent blades, i.e. you can’t avoid that you have to travel a bit to see these swords. Well, you might think that I’ve got it easy because I can read Japanese and because there is a very kind and active nihontô community in central Europe, or to be precise in Germany, that is willing to show and explain their treasured swords to those willing to learn. The master plan is about how to coordinate and combine theoretical and practical studies. Applying what you have learned to what you see on a sword and trying to bring in line what you see with what you have read earlier is harder as it sounds. Maybe some are natural at bringing these things together but it took me quite some years to assimilate that. Looking back on my first sword meetings it was basically as follows: Informed about the upcoming topic, I started to dig into my books and let’s say if the topic was the Rai school, I read and reread all the chapters on this school and studied all the accompanying pics and oshigata. Doing so, I thought I am pretty prepared and that I have a decent knowledge about the Rai school. But then you pick up one blade after the other and you realize that you have absolutely no clue. Put pointedly, somebody could sneak in any blade and you would still try to figure out for which Rai smith to go. And things don’t get better even after looking at the blades a second or third time. But this is how it goes and I am sure that many of you had the same experience at the very beginning, even with “preparing” for a meeting with given subject. The first thing is as mentioned to build up that bridge in your brain between what you read and what you see, and vice versa. This means, if you neglect building and expanding this bridge, you will run the risk of remaining on one side, i.e. on the theoretical side of just acculumating knowledge or on the practical side of just handling and/or accumulating blades without any deeper insight into classifying them. Don’t get me wrong, I am writing this in the context of the upcoming series on kantei. There is absolutely nothing wrong with focussing on one side or the other, how you tackle, or how deep you are delving into the fascinating subject of the nihontô.

 kanteichu2

A big help in building this bridge are knowledgeable colleagues who are able to recognize your level of knowledge and who give you a helping hand. But this means talking, i.e. you have to ask and the type of question you are asking will tell them pretty exactly where to pick you up. So don’t be shy. Ask someone to show you what a chikei is or how plenty of ji-nie looks compared to a blade with not that much ji-nie. Or how a bright nioiguchi really looks like for example, best in direct comparison with a blade with a subdued nioiguchi. With assimilating these and other points and combining them with your theoretical studies, you will maybe know the next time that you can rule out certain schools when you have a blade with a super bright nioiguchi if we stay with that example. Not asking makes learning so much more difficult and a good teacher with fine blades can save you years compared to learning kantei solely for yourself. But as indicated earlier, it might not be that easy to see fine blades and I am fully aware of the fact that I had it rather easy with being self-employed, flexible, married, no kids, and sitting in realistic reach of fine blades. This means, whenever a sword meeting was announced, my reply was basically: “Let me just get gas and I am on my way.” This brings me to right another factor that must not be overlooked when doing kantei, that is to say the factor of your condition on a particular day. My average trip to a sword meeting was about six or seven hours by car and sometimes I was just too tired to make any sense of what I was seeing. Accordingly, I was wong so many times but this never set me back, for this I had and have too much fun in appreciating these wonderful works of steel. Well, sometimes you wish the ground would open and swallows you for the ridiculously wrong bid you made on a certain sword…

To finish this introduction, I want to say that I hope this series will be of any help for your studies in general and that it will also be a nice supplement for those who got my Kantei volumes in particular which contain all the reference blades. In this sense, let’s go and the first part should follow in a bit.

PS: I will add a separate category for this series which obviously will be titled Kantei (you can find and pick the blog post categories at the very end of this blog).